Wednesday, November 28, 2012

Visions of Sugarplums


 I was asked to help do some table decorations for an upcoming Christmas Party. I thought it would be fun to cut some circles out of wood, paint them white, put some vinyl on them and wrap them up to become Peppermints! 

 As I was making these, my mind of course started thinking of other things I could do with these fun little gems.  I thought I would share with you some of the ideas I came up with...

As shown above,  I hooked the peppermints together to make a Garland. They look great as a part of a Mantle Display...

As a Garland on a Christmas Tree...


To Go along with the famous book, Twas the night before Christmas...  This looks so cute across the Girl's Bed. It really is Visions of Sugar Plums dancing above their heads!


They look cute as an invite to a Gingerbread House making party... Make a ticket and tie it onto the end of one of them...

They also look cute stuffed in a box...


or as an accent on a Gift...

I thought these would make a fun teacher or friend gift. 
I cut some boards, about 7 inches long by 6 inches high.  Painted them white.  Cut some vinyl with Whimsical names about peppermints, placed the vinyl on. Glued a peppermint on the board to give it a 3-dimensional look and made some fun signs... (notice the 25 cents representing Dec. 25th)

And the Peppermint Co.

Want to make some of your own?  I took some scrap mdf that I had that is 3/4 in. thick.  I used the inside of a roll of duct tape as a guide for my circle.  I took my jigsaw and cut out the circles.  Notice the circles are not perfect!

I next sanded them down and rounded the edges...


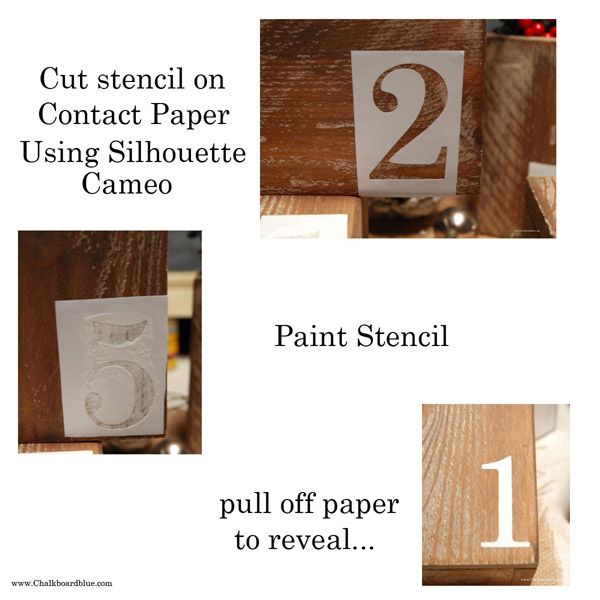
Painted them white. Cut some vinyl on my Silhouette...


placed the vinyl on.  Some of the ends of the swirls did not stick and hung out over the edges, so I glued them down.  

wrapped them up with Cellophane and tied with some ribbon!  


If you make some, I hope you have fun with them like I have!

 ***IF you would like to see how I used a Peppermint to mark our Christmas Advent Calendar, you can see that here or by clicking on the photo below to read more about it...


With Much Love & Gratitude,

Pin It

Sunday, November 25, 2012

Wooden Knob Magnets

 Hi if you are looking for a fun, useful gift to give to Neighbors, Teachers, Family, or a Birthday gift,  Knob Magnets are just what you are looking for! They are made from wooden knobs that are used for dressers and so many craft projects!

These are so simple and easy to do and make such a great gift!


When I made these, I ordered several from an online craft supply. www.Craftparts.com  has them for a reasonable price.  I ordered the knobs that are 1 1/4 inches wide.   I next ordered some magnets from an online craft magnet supply, I have also seen the magnets at Michaels and Hobby Lobby.  

I painted all of the knobs various colors.  I then stained them for an antique look. 


 I next glued magnets to the bottoms of them..

Once the magnets are glued on, they are done!  These are so fun to use on Magnets boards and Fridges! They make a perfect teacher gift!


Happy Holidays!

Ps.  I've been working on a few different christmas projects that I'm excited to share with you!  stay tuned!!


Always,
With Much Love & Gratitude,


Pin It

Sunday, November 18, 2012

How to build Barnwood Boxes

 We are well into the Holidays!! Would you like to know how I made my Barnwood Boxes?  


This is how I built my boxes: (I have all of the dimensions of all of the boxes at the end of this post.)

Materials:
3 planks of cedar fencing 
Brad nails that are 7/8 in. long
White paint I had on hand
Minwax stain.  (I used 3 kinds, Gel stain in color: Aged Oak)
small cans of stain: colors: special walnut and dark walnut

Brad nailer
Miter saw
clamps
palm sander
sponge brush for painting
rag for staining

I took only one board and ripped it on the table saw to 4 inches wide.

I used this 4 inch board to make two different boxes. For each box, cut 2 boards for front and back. Note: One will be your front and one will be your back.
2 cut for the sides
1 cut for the bottom

fit your pieces together. I fit the side pieces inside the front and back pieces so no seams show on the front or back.  Once they were placed together, I figured the bottom measurement and cut and fit it.


Clamped and Nailed on with the brad nailer on the corners, sides and around the bottoms.   There the box is built!  I built all of these in one afternoon.  They really weren't too bad.

Here they are before I painted them...

I painted them white.  Inside and out and the bottom, because you never know when you will want to flip them over for a different height..

Next, I used my palm sander and sanded them down quite a bit.  So only some of the paint shows through and the ridges in the wood show up... I sanded off more of some boxes than others too!

Then did a series of stain applications, I used the gel stain, the special walnut color and then the dark walnut color.  Once you have that applied, you can sand them down a little more to give them a more rough look or put more stain, its up to you!


To make my stencils, I cut them using my Silhouette Cameo on some Contact paper.  Placed them on the boxes, painted in the stencil and removed the contact paper...


Here they are with all the numbers:


Here are all the dimensions I used for each of my boxes.  I will give you the dimensions corresponding to the numbers on the boxes in the above picture:

Remember I cut the one board 4 inches right?  That board was used for the box with the number 4 on it and the box with the number 2 on it.  ( all dimensions are in inches) 

Cut two of each: 
-Front/Back (1 for front board and 1 for back board)
-Sides

Cut one of:
Bottom

No. 4's dimensions are:                   No. 2's dimensions are:
Front/Back:  4 wide x 7 tall              Front/Back: 4 tall x 10 wide
Sides: 2 1/2 wide by 7 tall                Sides: 3 wide x 4 tall
Bottom: 2 3/4 x 2 1/2                       Bottom: 3 wide x 8 3/4 long

No. 5 Dimensions are:                  No. 1's dimensions are:
Front/Back: 5 3/8 wide x 5 tall    Front/Back: 4 3/4 wide x 7 3/4tall
Sides: 3 3/4 wide x 5 tall              Sides: 3 3/4 wide x 7 3/4 tall
Bottom: 3 3/4 x 4 1/8                   Bottom: 3 1/2 x 3 3/4

No. 3's Dimensions are:
Front/Back: 4 3/4 wide x 6 tall
Sides: 3 1/4 wide x 6 tall
Bottom: 3 5/8 x 3 1/4

Note: vinyl does not like to stick to a stained surface, so it takes a little bit of work to get your vinyl to adhere, but still works!

I have LOVED these boxes!  They have been so fun to decorate with!!! If you make some, I know you will love them too!

If you would like to see more ideas about these boxes,  you can visit my first post about them here or by clicking on the photo below:


With Much Love & Gratitude,


Pin It

Wednesday, November 14, 2012

Zucchini Cake!

 For my last recipe from our Fall Dessert Table, I wanted to share with you a super yummy zucchini cake recipe.  When I made this for the Dessert Table, after our photo shoot, it literally disappeared!  My family devoured it!


This recipe is so easy to make!

   Aunt Cheryl's Zucchini Cake: Ingredients:
2 1/2 C. Flour
2 C. Sugar
1 1/2 tsp. cinnamon
1 tsp. Salt
1/2 tsp. baking powder
1/2 tsp. baking soda
1 C. Vegetable oil
4 eggs
2C. Shredded Zucchini
1/2 C. Chopped Walnuts (optional)

In a Mixing Bowl combine:
Flour, Sugar, Cinnamon,Salt, Baking Powder & Soda

In a Separate Bowl combine:
Oil & Eggs.  Add this mixture to the dry ingredients mix well.

Add zucchini, stir throughly, fold in nuts.

Pour in a 9 x 13 greased pan

Bake at 350 degrees for 35-40 min.

Frosting:
1 pkg. Cream cheese
1/4 C. Butter or margarine softened
1 Tbl. Milk
1 tsp. Vanilla
2 C. Powdered Sugar  (I ended up using more powdered sugar in my frosting)

I call this recipe Aunt Cheryl's Zucchini Cake because I got the recipe from her.  My aunt Cheryl was such an inspiration to me.  Cheryl was the sweetest, most energetic, crafty woman.  She always made things for others.  You never left her house without a gift she had made for you.  She loved golf and lived on a golf course.  She suddenly passed away in July and we miss her so. Here is a picture of her pointing to her almost Hole in One!


If you would like all of the yummy recipes my friend Melissa made for this dessert table, you can access them on her blog at Hollyhock and honeybees.
She made these pumpkin bars

Gingersnaps
And Butterscotch Cookies

If you would like the recipe to the caramel apples you can  see that recipe here

or the recipe for these doughnuts you can see that here


Again, this table was sooo fun to do!  Thanks Meliss for your help!  Who knows, Maybe we will do some more dessert tables in the future!!

With Much Love & Gratitude,


Pin It
Related Posts Plugin for WordPress, Blogger...
 
09 10